Interacting with System Services using DBus Dart
Table of contents
The Appwrite Cloud hackathon was in full swing, and I was eagerly participating, but I still needed to come up with an idea. Suddenly, a brilliant idea popped into my head (I'll keep it a secret for now since the hackathon isn't over yet). The project I decided to pursue involved adding a screenshot feature to a desktop app, allowing users to capture their desktop screen. As a Flutter fanboy, there are no better options for software development other than Flutter. However, I faced a hurdle—there was no existing screenshot plugin that worked seamlessly across Linux, Windows, and macOS. I had two options: either build the plugin myself or abandon the project.
Being someone who loves a challenge, I decided to take the difficult path and create a screenshot plugin specifically for Linux (since I was using Linux myself). I embarked on a journey of researching available resources and studying documentation.
After a day of research, I discovered that Linux has a system called DBus. DBus can be used to call a service that can take desktop screenshots and many other system services.
What is Dbus?
DBus simply is an inter-process communication (IPC) and Remote Procedure Call (RPC) mechanism used in Linux and other Unix-like operating systems. DBus is widely used in the Linux desktop environment for communication between different components, such as applications, system services, and hardware devices. It allows applications to interact with the desktop environment, access system services, and provide functionality to other applications. DBus is just a specification. There exist many libraries that implement this specification. Some of them are, GDbus, QtDbus, libddbus, dbus-java and dbus.dart.
DBus supports two main types of buses: the system bus and the session bus. The system bus is available to all users and processes on the system and provides access to system-wide services. The session bus is specific to a user's login session and facilitates communication between applications within that session.
Taking a Screenshot Using DBus
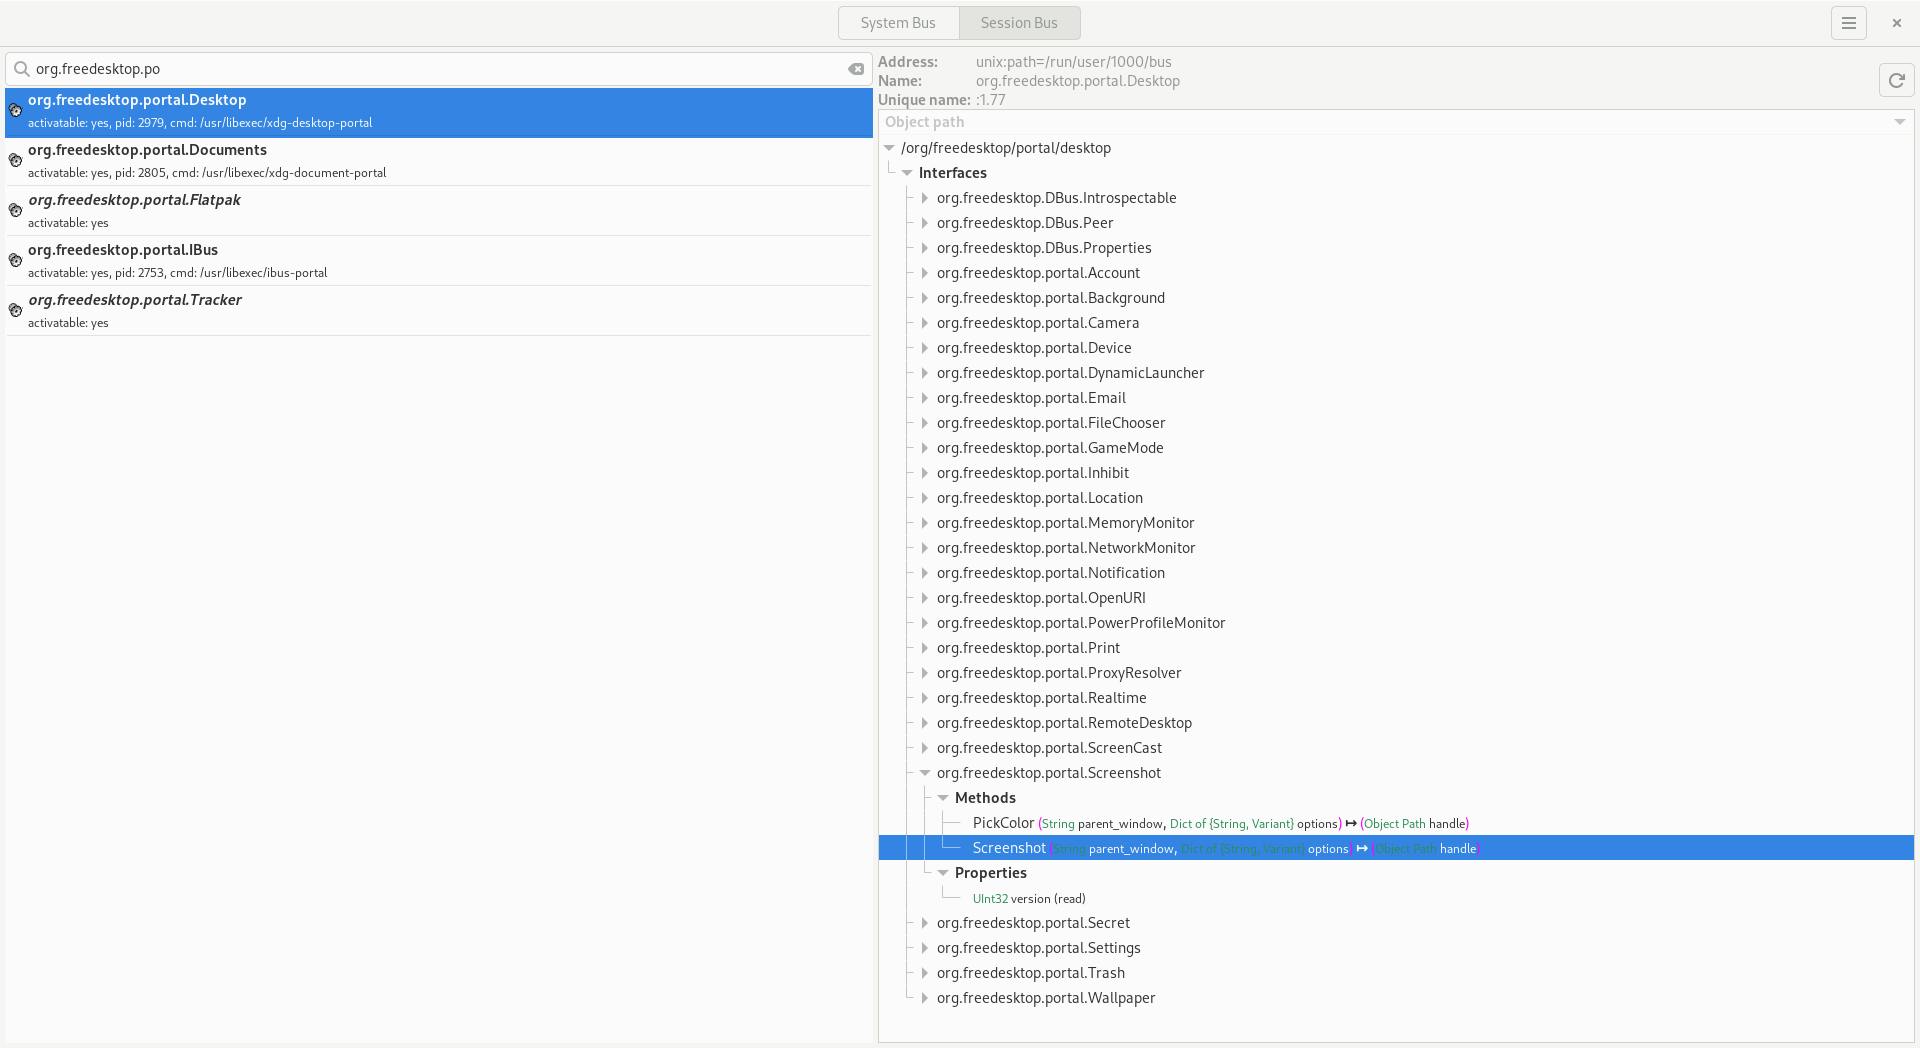
xdg-desktop-portal is the process we are going to use to take a screenshot. It exposes a series of D-Bus interfaces known as portals under the well-known name org.freedesktop.portal.Desktop and object path /org/freedesktop/portal/desktop.
Objects in DBus are the software entities exposed by processes on the bus, allowing other processes to interact with them. Each object is associated with one or more interfaces that define the methods, signals, and properties that the object supports.
There is a org.freedesktop.portal.Screenshot interface associated with /org/freedesktop/portal/desktop object that has a method to take screenshots.
The Screenshot method takes two parameters, parent_window and options.

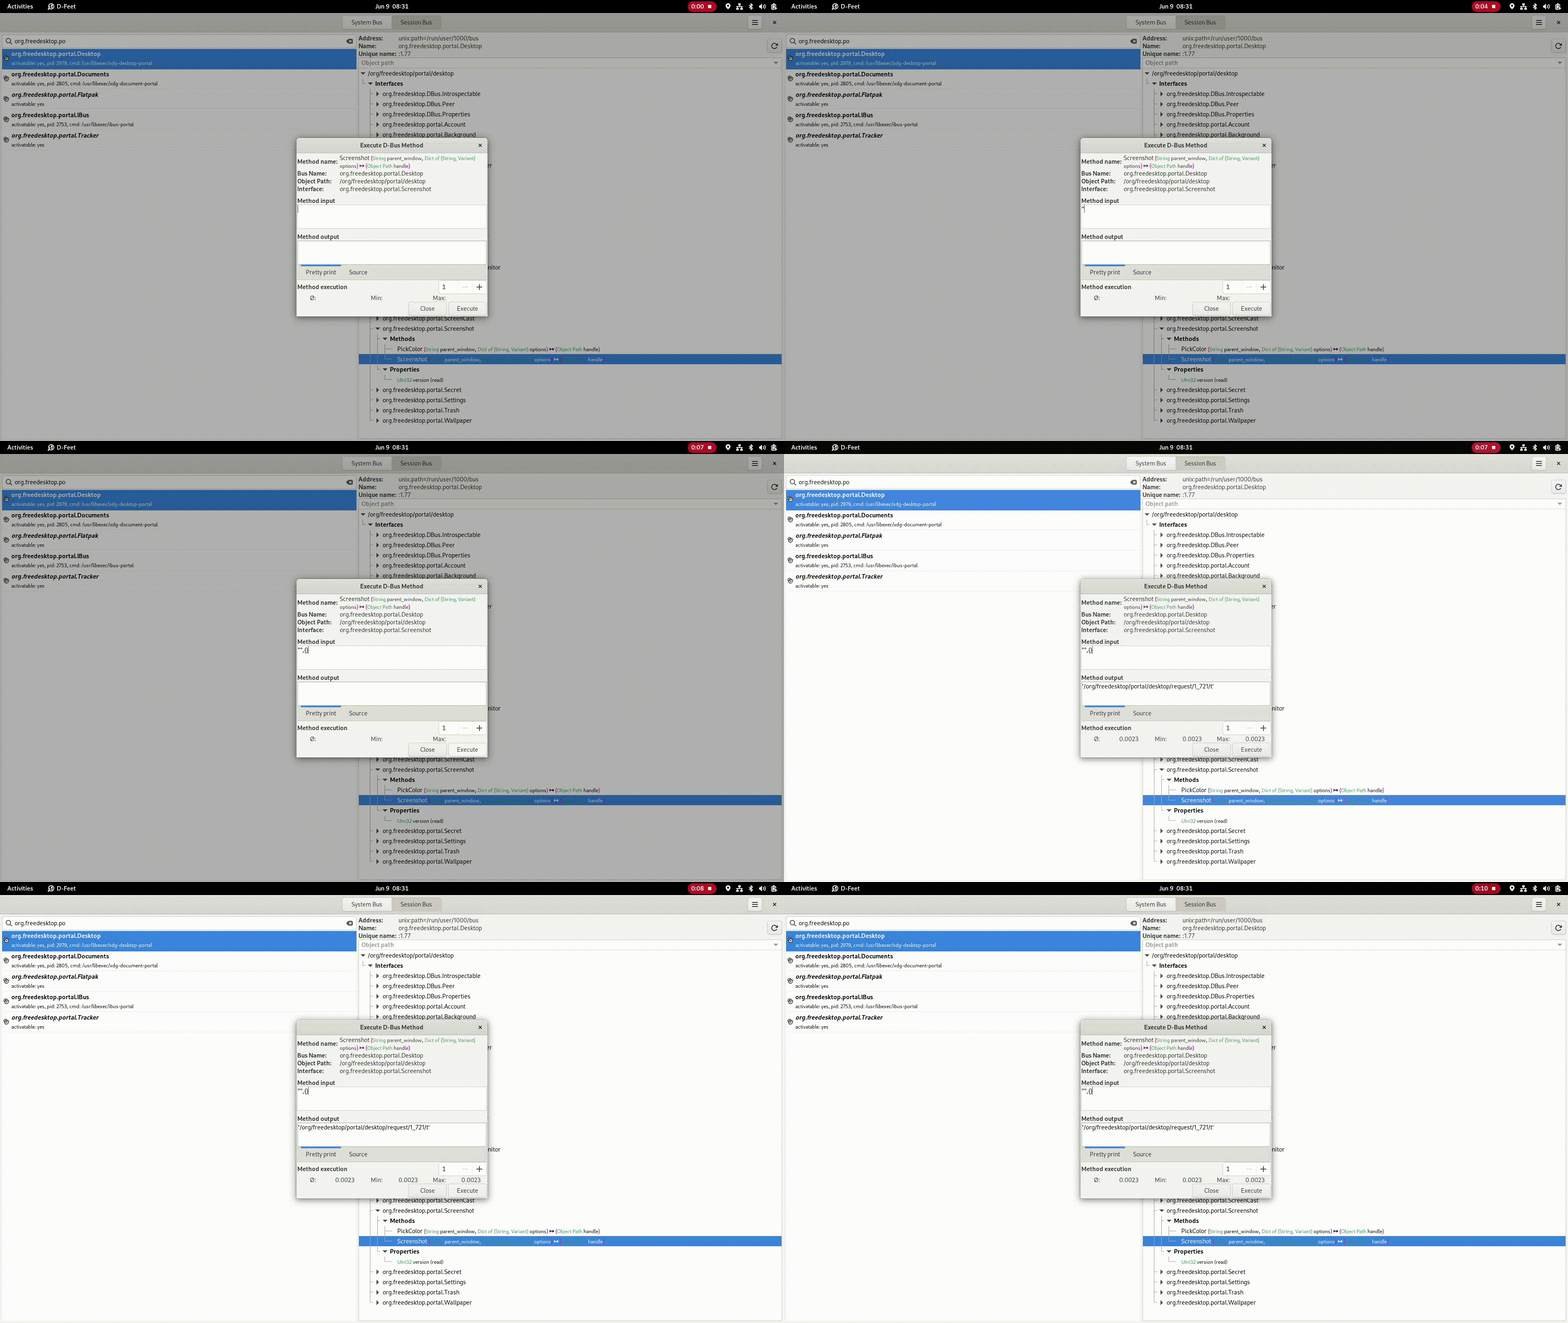
To validate the functionality of D-Bus before implementing it in my application, I decided to perform a proof of concept. Using the DFeet client, I executed the method, and to my delight, it successfully captured the screenshot and saved it in the user's Pictures folder.

Using DBus Dart
There is a Dart client implementation of DBus that allows us to interact with D-Bus from your Dart programs. To add it as a dependency in your Flutter project, you can use the following command:
flutter pub add dbus
Additionally, DBus Dart provides a command line tool that enables you to generate Dart classes from D-Bus interface definitions. To install this tool, you can use the following command:
flutter pub global activate dbus
With the DBus Dart package and the command line tool installed, you have the necessary tools to work with D-Bus in your Flutter projects. You can leverage the DBus Dart client implementation to communicate with D-Bus services and utilize the command line tool to generate Dart classes that facilitate D-Bus interaction in your codebase.
Now to generate Dart classes we need interface definition. Interface definitions are written in XML. To capture a screenshot using D-Bus, we utilize two interfaces:
The org.freedesktop.portal.Screenshot interface allows us to call the screenshot method.
<?xml version="1.0"?>
<node name="/" xmlns:doc="http://www.freedesktop.org/dbus/1.0/doc.dtd">
  <interface name="org.freedesktop.portal.Screenshot">
    <method name="Screenshot">
      <arg type="s" name="parent_window" direction="in"/>
      <arg type="a{sv}" name="options" direction="in"/>
      <arg type="o" name="handle" direction="out"/>
    </method>
    <method name="PickColor">
      <arg type="s" name="parent_window" direction="in"/>
      <arg type="a{sv}" name="options" direction="in"/>
      <arg type="o" name="handle" direction="out"/>
    </method>
    <property name="version" type="u" access="read"/>
  </interface>
</node>
The org.freedesktop.portal.Request interface allows us to listen to the response signal, which provides us with the path of the captured screenshot image.
<?xml version="1.0"?>
<node name="/" xmlns:doc="http://www.freedesktop.org/dbus/1.0/doc.dtd">
  <interface name="org.freedesktop.impl.portal.Request">
    <method name="Close">
    </method>
  </interface>
</node>
To generate Dart classes from these interface definitions, you can use the DBus Dart command line tool. Make sure you have the tool installed (as mentioned earlier), and then you can run the following command:
dart-dbus generate-object org.freedesktop.impl.portal.Request.xml -o request.dart
dart-dbus generate-object org.freedesktop.portal.Screenshot.xml -o screenshot.dart
Once you have generated the Dart classes from the D-Bus interface definitions, you can place them inside the lib folder of your Flutter project. This ensures that the classes are accessible within your project's codebase.
After placing the generated Dart classes in the lib folder, you are now ready to implement the necessary code to interact with D-Bus and perform the desired actions, such as capturing screenshots.
First, make sure you have the necessary dependencies added to your project.
import 'package:dbus/dbus.dart';
import 'package:flutter/material.dart';
import 'request.dart';
import 'screenshot.dart';
import 'package:uuid/uuid.dart';
To begin, you need to initialize a D-Bus session bus client. Alongside the client initialization, we need uuid package to generate a unique identifier token. The purpose of using a token is to ensure that the request and its corresponding response are associated correctly. The token can contain only alphanumeric characters.
final token = const Uuid()
      .v4()
      .replaceAll('-', '')
      .replaceAll('{', '')
      .replaceAll('}', '');
  var client = DBusClient.session();
To effectively listen to the response of the Screenshot method, we need to set up a response listener. Prior to that, we must obtain the unique name acquired by the current client. Once we have obtained the name, we can proceed to create the request object using the unique name, client, and the unique token we generated earlier. With the request object in place, we can then activate the response listener.
When a new response event is received, the "results" property of the event will contain the URI (Uniform Resource Identifier) of the captured screenshot. This URI serves as the location or path where the screenshot image is stored. By accessing this URI from the response event, we can retrieve the necessary information about the captured screenshot and utilize it as desired within our application.
client.nameAcquired.listen(
      (event) {
        String? serviceName = event.replaceAll(':', '').replaceAll('.', '_');

        var request = OrgFreedesktopPortalRequest(
          client,
          'org.freedesktop.portal.Desktop',
          path: DBusObjectPath(
              "/org/freedesktop/portal/desktop/request/$serviceName/$token"),
        );

        RegExp filepathReg =
            RegExp(r"(?:(?:file?|ftp):\/\/)?[\w\/\-?=%.]+\.[\w\/\-?=%.]+");
        request.response.listen(
          (event) {
            screenshotPath = filepathReg
                .allMatches(event.results['uri'].toString())
                .first
                .group(0);
          },
        );
      },
    );
With the response listener set up, we can proceed to create a function that invokes the Screenshot method. To initiate the Screenshot method, we need to create an object of the Screenshot interface. Once the object is created, we can call the Screenshot method by providing the unique token that we generated earlier as a parameter. This token helps to ensure the proper association of the request with its corresponding response. By invoking the Screenshot method, we trigger the process of capturing the desired screenshot.
void takeScreenshot() async {
    var object = OrgFreedesktopPortalScreenshot(
      client,
      'org.freedesktop.portal.Desktop',
      path: DBusObjectPath(
        "/org/freedesktop/portal/desktop",
      ),
    );
    await object.callScreenshot(
      "",
      {
        "handle_token": DBusString(token),
        "interactive": const DBusBoolean(false),
      },
    );
  }
It is important to remember to close the client once we have finished using it.
client.close();
By calling the takeScreenshot method, we can capture the screenshot and receive the path of the screenshot image file through the listener. This demonstrates how we can interact with system services in Linux.
While this tutorial focused on the Screenshot interface as an example, you can utilize the same approach to create applications that handle file management, network management, notification handling, and more.
Here is the complete code for this tutorial:
import 'package:dbus/dbus.dart';
import 'package:flutter/material.dart';
import 'org.freedesktop.portal.Request.dart';
import 'org.freedesktop.portal.Screenshot.dart';
import 'package:uuid/uuid.dart';

void main() {
  runApp(const MyApp());
}

class MyApp extends StatelessWidget {
  const MyApp({super.key});

  // This widget is the root of your application.
  @override
  Widget build(BuildContext context) {
    return MaterialApp(
      title: 'Flutter Demo',
      theme: ThemeData(
        colorScheme: ColorScheme.fromSeed(seedColor: Colors.deepPurple),
        useMaterial3: true,
      ),
      home: const MyHomePage(title: 'Flutter Demo Home Page'),
    );
  }
}

class MyHomePage extends StatefulWidget {
  const MyHomePage({super.key, required this.title});
  final String title;

  @override
  State<MyHomePage> createState() => _MyHomePageState();
}

class _MyHomePageState extends State<MyHomePage> {
  final token = const Uuid()
      .v4()
      .replaceAll('-', '')
      .replaceAll('{', '')
      .replaceAll('}', '');
  var client = DBusClient.session();
  var screenshotPath;

  @override
  void initState() {
    super.initState();
    client.nameAcquired.listen(
      (event) {
        String? serviceName = event.replaceAll(':', '').replaceAll('.', '_');

        var request = OrgFreedesktopPortalRequest(
          client,
          'org.freedesktop.portal.Desktop',
          path: DBusObjectPath(
              "/org/freedesktop/portal/desktop/request/$serviceName/$token"),
        );

        RegExp filepathReg =
            RegExp(r"(?:(?:file?|ftp):\/\/)?[\w\/\-?=%.]+\.[\w\/\-?=%.]+");
        request.response.listen(
          (event) {
            screenshotPath = filepathReg
                .allMatches(event.results['uri'].toString())
                .first
                .group(0);
          },
        );
      },
    );
  }

  void takeScreenshot() async {
    var object = OrgFreedesktopPortalScreenshot(
      client,
      'org.freedesktop.portal.Desktop',
      path: DBusObjectPath(
        "/org/freedesktop/portal/desktop",
      ),
    );
    await object.callScreenshot(
      "",
      {
        "handle_token": DBusString(token),
        "interactive": const DBusBoolean(false),
      },
    );
  }

  @override
  void dispose() async {
    await client.close();
    super.dispose();
  }

  @override
  Widget build(BuildContext context) {
    return Scaffold(
      appBar: AppBar(
        backgroundColor: Theme.of(context).colorScheme.inversePrimary,
        title: Text(widget.title),
      ),
      body: Center(
        child: Column(
          mainAxisAlignment: MainAxisAlignment.center,
          children: <Widget>[
            const Text(
              'File:',
            ),
            Text(
              '$screenshotPath',
              style: Theme.of(context).textTheme.headlineMedium,
            ),
          ],
        ),
      ),
      floatingActionButton: FloatingActionButton(
        onPressed: takeScreenshot,
        tooltip: 'Capture',
        child: const Icon(Icons.add),
      ),
    );
  }
}
I hope you found this tutorial helpful. Please feel free to leave any comments or feedback.
